

Cornerstones of my Kitchen Garden No.2
Success & Failure. Enjoyment & Disappointment. Lessons to learn!

You join me now, a few years down the road, admittedly with a few failures under my belt, but a whole raft of successes and oodles of enjoyment too. Not to mention more gluts than you can shake a rake at. In that time, there have been hard lessons learned (are there any other kind worth learning?) and I thought it would be good to review the build and look at anything I would change, given the mighty power of hindsight. Let’s get stuck in!
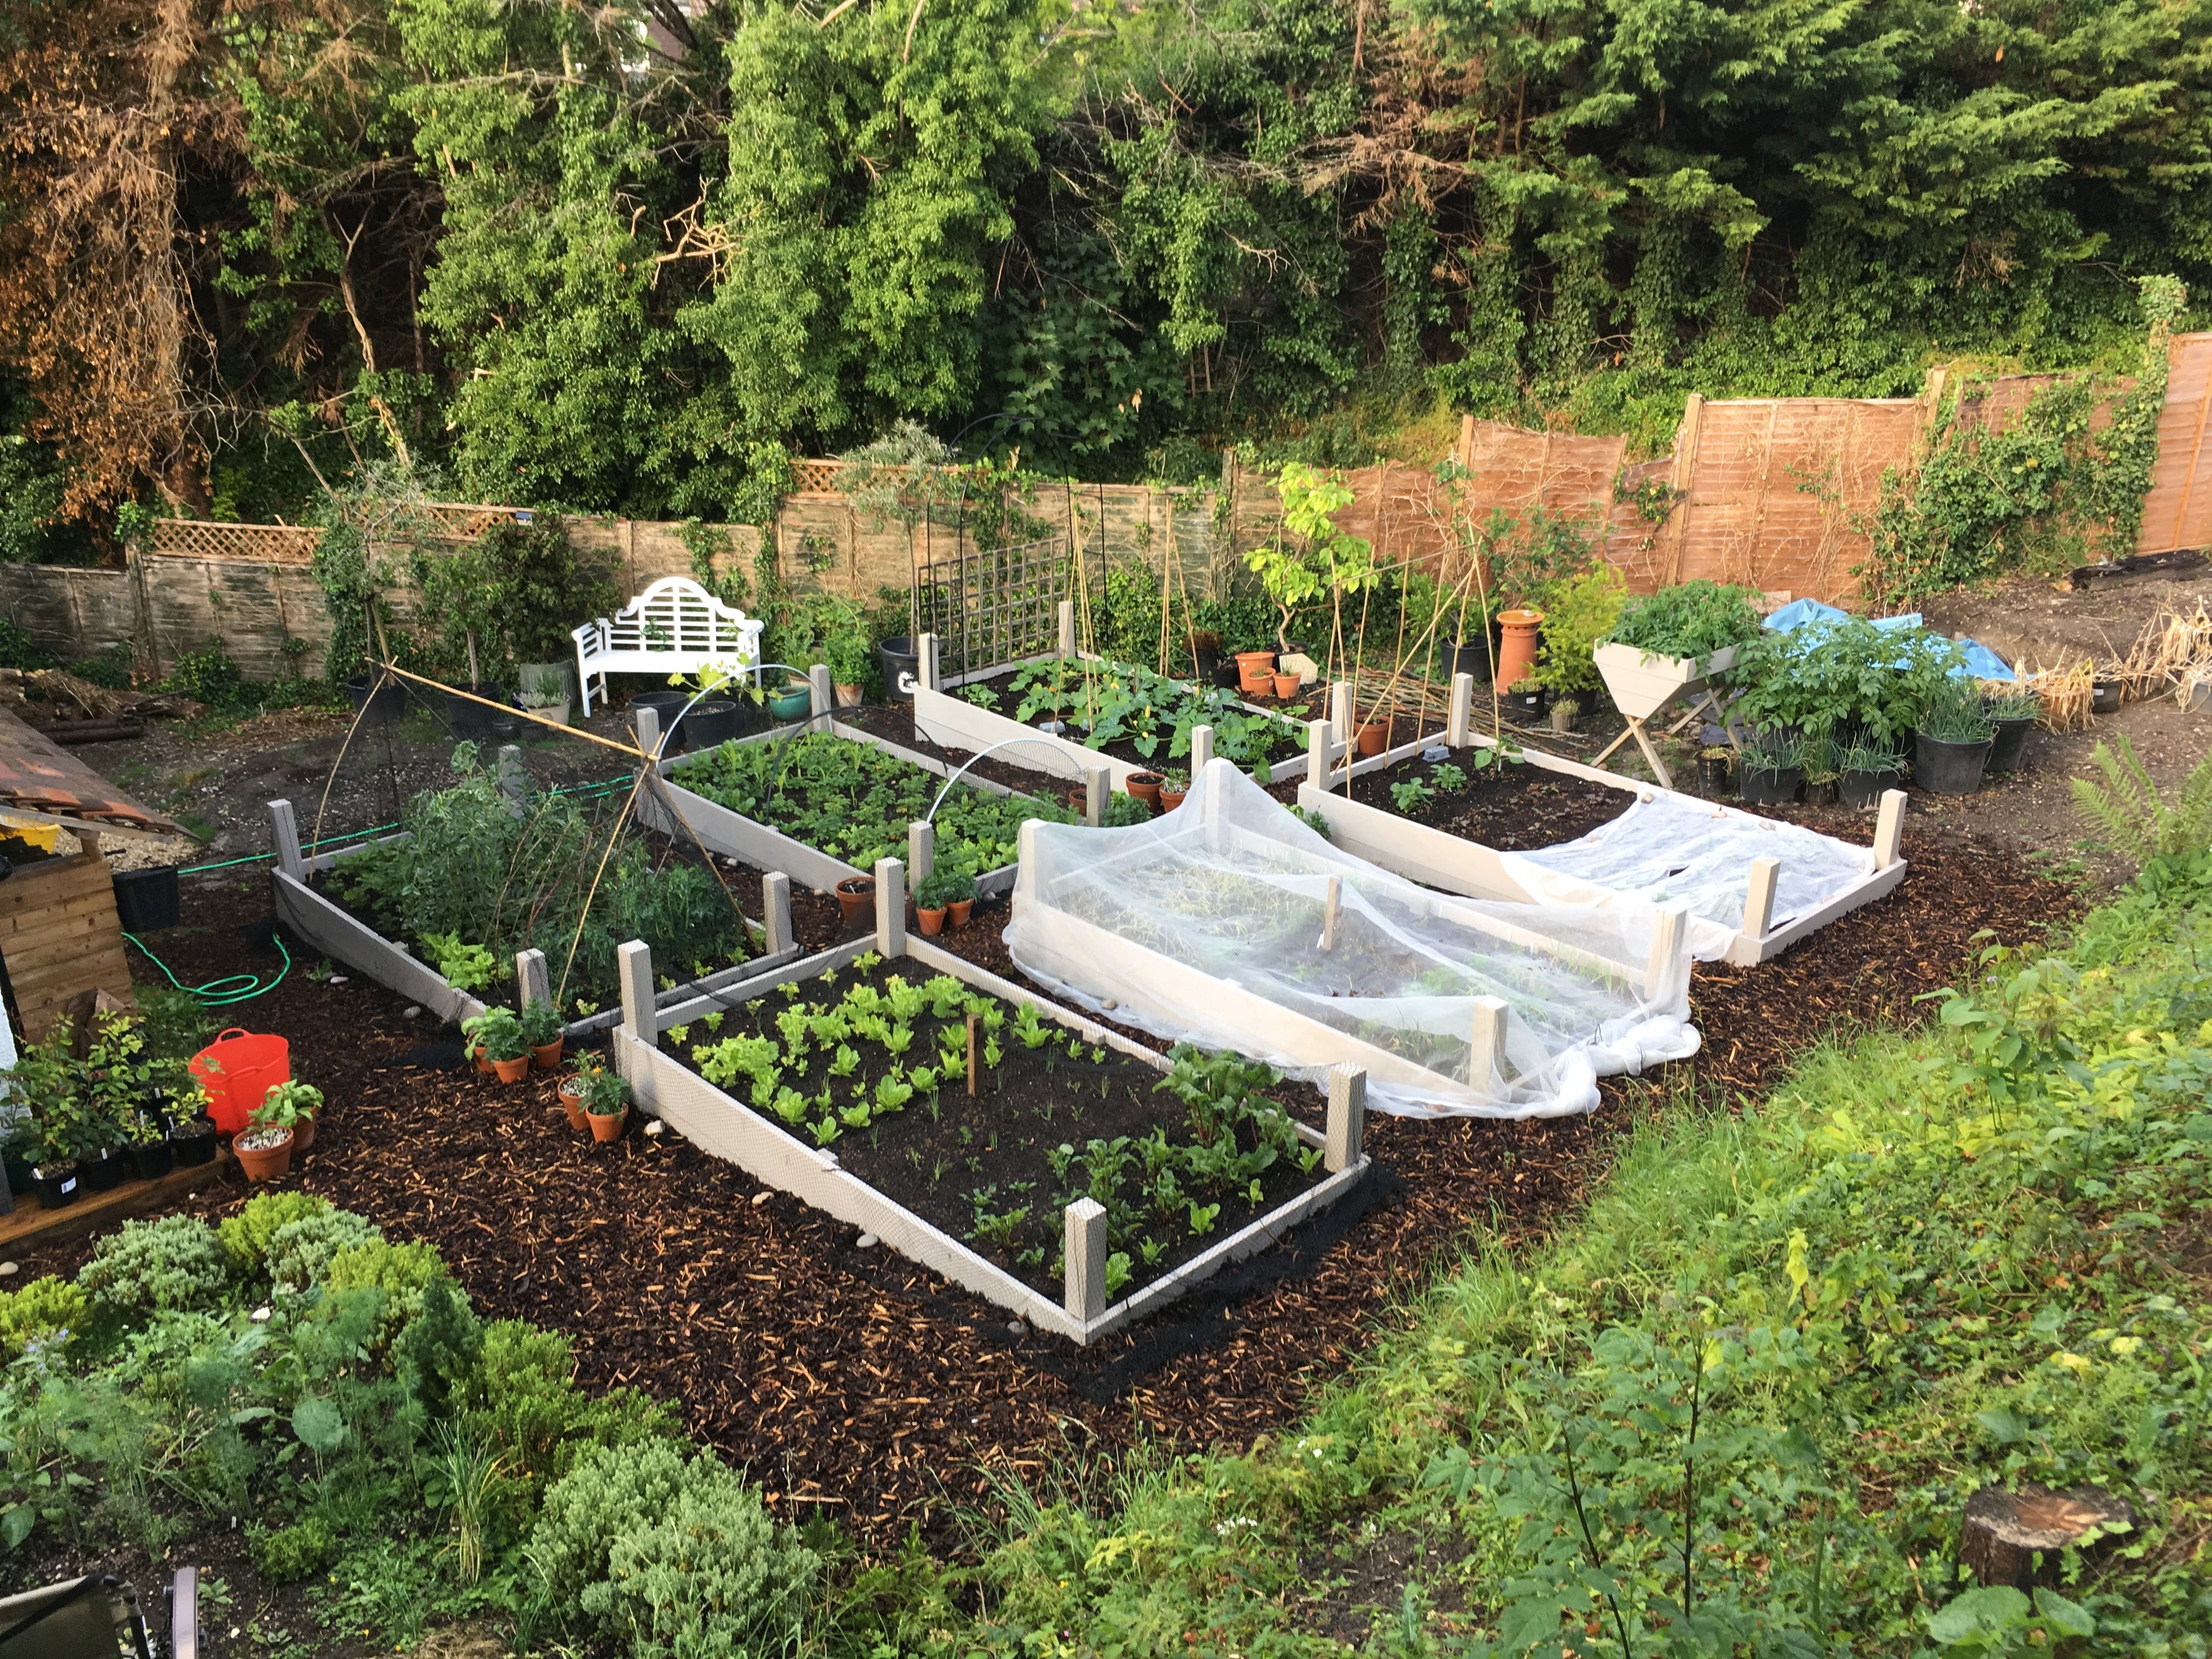
The plan, the build
Simply put, it worked! The layout is practical and functional with easy access across the beds and all around with a laden wheelbarrow. The raised beds remain solid! There’s been no movement at all. I decided to leave the corner posts longer, realising that they’d help support the hoops and arches in the beds. It’s not a particularly windy site, but the ‘soil’ is still quite shallow and a fully ‘beaned’ arch acts like a sail.
Problem
The untreated (but painted) scaffold boards have steadily decayed, quicker than I’d hoped. They look absolutely fine on the outside, but on the inside, where they’re in contact with the compost, a few now have large cavities - steadily increasing in size thanks to the diligent work of the woodlice. More annoyingly, these cavities make perfect hidy-holes for slugs!
Solution
As the boards fail, I’ll replace each bed with cedar boards. Cedar is naturally rich in oils and resin and can resist rot for many years. It’s naturally resistant to moisture and unlikely to warp. It is more expensive, but it’s a fantastic long-lasting timber, that beautifully greys or ‘silvers’ over time.
Path to glory or road to ruin?
Woodchip is a great material, slowly decomposing and disintegrating, feeding the soil as it goes. It also creates a lovely crumbly compost underneath. By its very nature, woodchip needs to be topped up, usually every couple of years. Otherwise, you’ll fine bald patches appearing in your path. In this Kitchen Garden, through a combination of slope, heavy rain, and me pushing a barrow through it, the bald spots appeared quicker than I’d anticipated.
Problem
If I wasn’t on the ball, 100% of the time, pioneering weeds would quickly establish in those bald spots. Thanks to my cycling bipolar (with long depressive episodes), I was out of the game for too long. Dandelions, docks, and perennial thistles established their tap roots, and I’m still pulling out the last remnants two years down the line. If I can impart one single nugget of wisdom, it’s to ‘weed little and often’. Stay on top of it, before it gets on top of you! It will make life much easier!
Solution
After just two years, the paths were cleared, but the woodchip wasn’t wasted. Oh no! It’s far too valuable for that. It was eagerly hoovered-up with the mower, pulverising the chips at the same time. The crumbly compost beneath was also raked up. Then it was all poured into a compost bay, where it transformed into the most remarkable and beautiful compost!
I then used gravel to replace the woodchip. We’d made huge changes to the Flower Garden and had a mountain of gravel to spare, so it just made sense to use it in the Kitchen Garden. It’s only a local shingle, but as we’re so close to the Cotswolds it has that lovely honeyed buff colour.
Interestingly, I’ve found gravel to be far more durable on the slope and, thankfully, doesn’t get caught up in the row covers. A minor irritation with woodchip… larger pieces of bark would constantly entangle themselves in the bird netting. Oddly, gravel is more comfortable to kneel on, compared to large bark chippings, but that might be just me and my knees?
Gravel also packs down into a harder surface, so it’s far better for wheelbarrows and heavy boots, especially on this slope. I could be imagining it but the crops seem to benefit from the increased light that is reflected back up by the buff and chalky stone. It certainly feels a much brighter space!
The compost conundrum
Although I had bought the original peat-free multi-purpose compost from a reputable supplier, it was full of rubbish: Pieces of glass, plastic debris, aggregate, shreds of food compost bags, etc. Very disappointing and really frustrating! I’m a firm believer in keeping peat in the ground, where it belongs! But, persuading gardeners to give it up, when the alternative is literally garbage just infuriates me!
I’ve used peat-free compost exclusively for a decade, but this was the worst I’ve ever seen. Not only was it full of plastics, it also had a lot of wood. Not something I had considered an issue… initially. But when I noticed young plants turning yellow, I investigated further. This is what I found:
When wood decomposes in the soil, it’s the microbial and fungal processes that break it down. Wood is high in carbon, low in nitrogen. As the bacteria and other microbes proliferate, they require more and more nitrogen to survive and ‘do their job’. The effect is a temporary but significant reduction in nitrogen in the surrounding soil.
Problem
My first crops were okay initially, but soon exhibited sign of chlorosis - the leaves were yellowing and the growth was stunted. At one point, I thought the compost may have been contaminated with that utterly abominable aminopyralid herbicide, but the symptoms didn’t match. Thankfully!! As it turned out, they simply weren’t getting enough nitrogen and that is very easily remedied.
Solution
I threw handfuls of chicken manure pellets (very high in nitrogen) all over the beds and watered them in, ensuring the compost stayed moist, increasing nitrogen availability and uptake for plant roots. Within a couple of weeks, the crops greened-up considerably and growth was restored. By the summer, you couldn’t really tell that there had been any issues at all. The following year was absolutely fine as the decomposing wood was no longer drawing out the nitrogen.
The mystery of disappearing compost
During the process of settling, growing vegetables, harvesting, rain and watering, etc. the level of the compost within a raised bed drops… It’s natural, so don’t panic. (Although, when I realised how much the level had dropped, I was actually a little unnerved) Raised beds do need topping up each year, especially if they are filled with compost. From the very first autumn, all my beds have been topped-up annually with my gorgeous homemade garden compost.
Composting is a wonderfully beneficial cyclical process. All the waste from the garden is transformed into a nutrient rich, organic matter. I use this as a mulch to continue feeding the soil biome. This in turn feeds next season’s crops, the waste of which goes on the compost heap… And so the cycle continues. It’s beautiful in its simplicity. It’s also very easy!
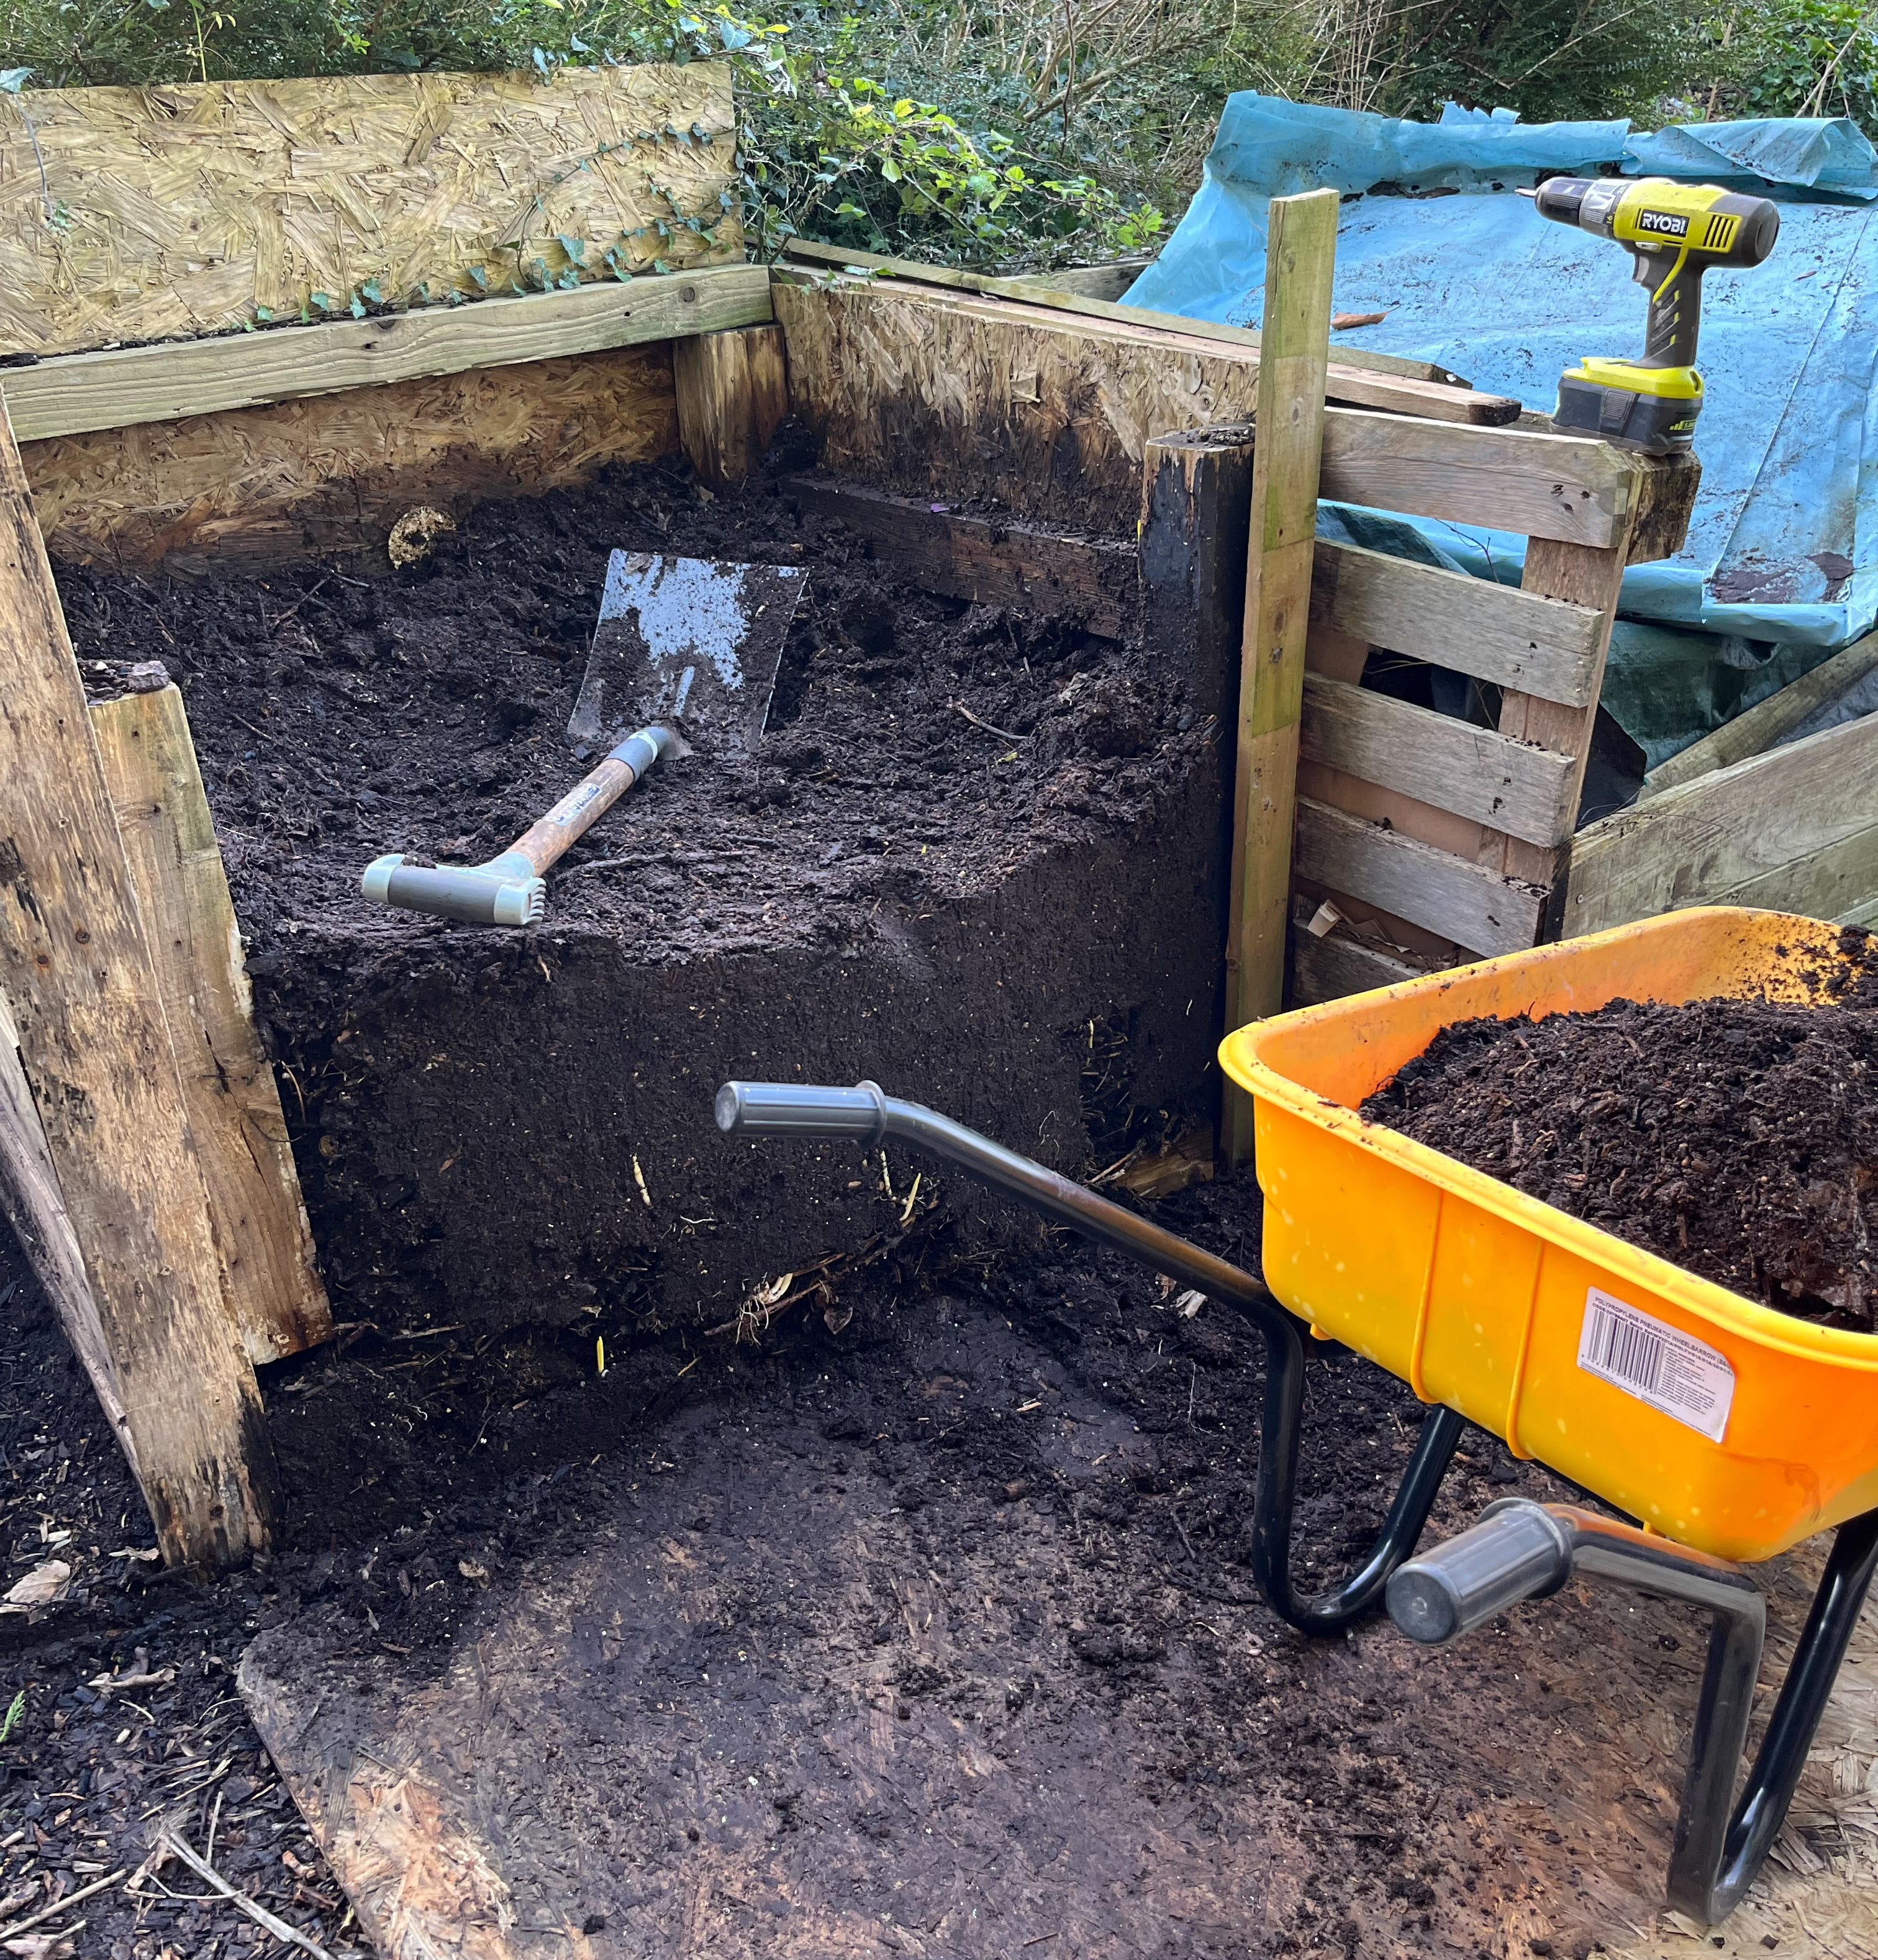
Fill wheelbarrow, wheel to bed, tip up, rake it out. Repeat!
I spread roughly 5-6cm (2-3in) over all six beds, lumps, chunks, woody bits and all. Easy cheesy peasy! By the time spring rolls around the frosts, winter weather, and soil life have broken down the clods and clumps, leaving a light friable, easily workable surface layer. Fine enough for sowing carrot seeds, dibbing holes and planting out the first seedlings of the season.
The compost continues to feed the soil life and the plants for the entire growing season. Nutrients don’t leach out. No further feeding or additives or amendments are necessary. Making your own compost really can save you £££s! Not to mention the faff and the time needed for all those largely unnecessary additions.
Watering well, or well watered?
Watering vegetable crops takes more understanding than I’d originally bargained for. As an example, leafy crops like salad leaves require far more water, more frequently, more regularly, compared to root crops. Tomatoes and squash appear only to need a weekly deep drink. Celery is basically a bog plant and needs water all the time! Some crops only need watering while young plants are establishing, then very little until they’re near cropping stage. Potatoes, peas and broad beans, onions and shallots all seem to fall in this category.
But, without fail, ALL crops need regular water for that first week or two after planting, while they’re establishing roots. This is a critical time, especially if they’re small plug plants! Don’t assume that because they are now in the ground they suddenly have access to all the moisture they need. Roots need time to grow.
If it’s hot and dry, water daily or every other day, just until those tiny roots establish themselves and you see new growth emerging. Crops you’ve already potted on into 9cm pots, for example, aren’t as desperate as they already have an established root system… but water them anyway.
Time for a drink!
Timing can play an important role too and the best time to water is morning… if you can. At least that’s my conclusion anyway. Early watering has three benefits:
One, the water can percolate down to the roots, before the heat of the day builds and evaporates any water in the surface layer. The plant can then spend the entire day drawing up moisture.
Two, the composts/soil surface will be dry by the evening, making it harder for those molluscs to slime their way around. Yes, they can still travel, but why make it easier for them?!
Three, transpiration is really most active during the day time. Transpiration is the process of evaporation through leaves, stems and flowers, creating an upward pull and flow of moisture and nutrition from soil, to root, to stem and leaf.
Mains or Rains?
Last thoughts on water… In the UK, we mostly have two options: Mains Water or Rain Water. Mains water, you obviously have to pay for, but it’s clean. Yes, there are chemicals such as chlorine and fluoride (potentially nitrates from agricultural run-off), plus naturally occurring minerals like calcium, magnesium, sodium and sulphate. But to imagine that they are present in such quantities or concentrates to significantly affect vegetable growth in a home garden setting is alarmist nonsense. It’s safe.
Rain water, is free, but although it may fall ‘clean’ you have to store it. During storage, bacteria can proliferate, especially in the sun and in the summer heat. Also, unless the waterbutt is well sealed and cleaned regularly, you’ll find detritus floating around and collecting on the bottom… mostly dead worms, slugs, snails, insects and other invertebrates, all adding to the warm soup! Your nose will tell you something is ‘off’ when you life the lid. But don’t panic. There are ‘treatments’ available for waterbutts, usually in the form of a solution or effervescent tablet.
I use both mains water and captured rainwater. But I use them differently. For leafy salads and herbs, or vegetables with high water content, such as tomatoes, cucumbers, courgettes, etc I use mains water, just in case something really nasty is brewing in the waterbutt. I tend to grow these crops all in the same beds to make watering faster and easier. For everything else, I use the stored rain water, from several water butts, using two watering cans at a time.
Looking ahead, I will probably install one, possibly two, 1000ltr IBC tanks and reconfigure our gutters to capture more rainwater. I’ll also install a submersible pump so I can use a hose and save time.
Enough food to feed an army?
I’m still trying to master ‘quantity’. I doubt I ever will! I always sow too much and, as I always fear the loss of an entire batch of seedlings, I raise and plant everything! So for two people, we end up with over 30 lettuces, 12 massive courgette plants (when two is plenty!), armfuls of cucumbers, hundreds of beetroot and carrots, sacks full of potatoes, etc.
As you can imagine, there are gluts everywhere!
It sounds like a bounty (and it is) but it's way too much food for two. We store what we can in the garage. We freeze pureed tomato and passata, chilies, herbs, etc. However, there’s too much that goes uneaten and thrown on the compost heap, which is an absolute crime!
This past year has been better. Any excess was given away to family, friends, and neighbours. In fact, anyone passing the gate was offered a cucumber or courgette (no, not the emoji type). Occasionally, I’ll set-up a table outside the gate with excess produce and surplus vegetable plants and they disappear like hotcakes, so I’ll definitely keep up with that.
Next year (and I know I say this every year) things will be different. This time, I’m planning on sowing a wider variety of crops, but fewer of each. We’ll see!
Coming up…
Before we get down to the nuts and bolts of sowing and growing, I want to share my thoughts and experience on what crops to grow, perhaps a little wisdom too. Learning to grow what you love to eat, not what you’re told to grow, was a great lesson! Growing winter veggies required some brutal honesty as did the arrival of Blight!